We all know that hackers and other nosy creatures on the web make use of public services to get information on targets – it’s called OSINT (Open Source Intelligence).
In short, that’s information you can acquire without breaking laws. Ideally, it’s even information that the target gives away for free. But for that to happen, the target has to interact with you or a service under your control.
Hey, this Blog is under my control! By reading this, you’ve given me intel on you – even if you’re using a VPN 😉
We just need to find a way to parse and automatically analyze the information you have so generously presented to me.

To achieve this, I will be using this running WordPress instance, the built-in shortcode feature and a Kali 2024.3 on arm64 (Raspberry Pi 4b) with a MySQL service.
Preparation
Our Kali Image comes with MariaDB pre-installed, we just need to run
sudo systemctl enable mysql
sudo mysql
to enable the service on startup and enter the mariadb console
We create a database with two tables, like so
CREATE DATABASE gressi_st IF NOT EXISTS;GO;
USE gressi_st;

CREATE TABLE st_requests (
ID int NOT NULL PRIMARY KEY,
request_ip varchar(48),
request_isProxy tinyint(1),
request_proxyIP varchar(48),
request_useragent varchar(255),
request_timestamp datetime,
request_info varchar(2048)
);

CREATE TABLE st_resolves (
ID int NOT NULL PRIMARY KEY,
request_id int,
resolve_geolocation varchar(32),
resolve_provider varchar(32),
resolve_vpn varchar(16),
resolve_info varchar(255)
);

CREATE USER '[user]'@'[wordpress-ip]' IDENTIFIED BY '[password]'; GRANT ALL PRIVILEGES ON gressi_st.* TO '[user]'@'[wordpress-ip]';FLUSH PRIVILEGES;
For the socket to accept inbound connections, the /etc/mysql/mariadb.conf.d/50-server.cnf has to be edited, so that the bind-address value is set to 0.0.0.0 (default is localhost)
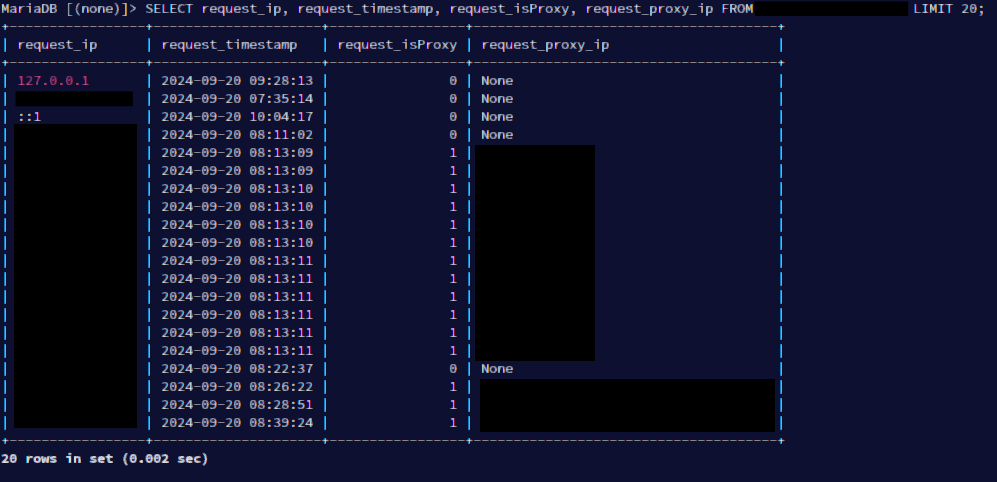
For the WordPress site of the application, we are just going to use st_requests for now. Later, in part 2, each row in the table will get a corresponding resolve entry.
Grabbing the info we need is as simple as inspecting the headers in php. For that, we create a file ‘my_shortcode.php’ in the directory of your current wp-theme.
cd /path/to/wordpress/wp-content/themes/[current_theme]
nano my_shortcode.php
function trigger_springtrap(){
# if the proxy header is set, we know that the client's remote address is not the real ip.
if(isset($_SERVER['HTTP_X_FORWARDED_FOR'])){
$isProxy = true;
$proxyIP = $_SERVER['REMOTE_ADDR'];
}else{
$isProxy = false;
$proxyIP = "None";
}
# Cloudflare prints the true ip into a custom header called "CF-Connecting-IP". We can use this in php like this:
$ip = $_SERVER['HTTP_CF_CONNECTING_IP']??null;
$useragent = $_SERVER['HTTP_USER_AGENT']??null;
$date = date('Y-m-d H:i:s');
# I simply print all the headers into the info field for good measure (urlencoded)
$info = http_build_query(getallheaders(), '', ';');
mysqli_report(MYSQLI_REPORT_ERROR | MYSQLI_REPORT_STRICT);
$mysqli = new mysqli("example.local:5432", "[USER]", "[PASSWORD]","[DB]");
$stmt = $mysqli->prepare("INSERT INTO
st_requests(request_ip, request_timestamp, request_ua, request_info, request_proxy_ip, request_isProxy)
VALUES (?,?,?,?,?,?)");
$stmt->bind_param("sssssi", $ip, $date, $useragent, $info, $proxyIP, $isProxy);
$stmt->execute();
$stmt->close();
$mysqli->close();
return '<p> -----EOF----- </p>';
}
# It's time to tell WordPress we want to call this function by using the shortcode "springtrap":
add_shortcode('springtrap', 'trigger_springtrap');Finally, all we have to do is make the file executable for the www user and add an include statement into the theme’s function.php
sudo chown www-data my_shortcode.php
sudo nano functions.php -> include('my_shortcode.php');
Now, if I add the shortcode “springtrap” in [brackets] anywhere on my pages (while the current theme is applied), the custom PHP code will write the connection details into the kali database. For transparency purposes, I print a line of visible SAFE html to the page (see the “return” value in the above php script. Furthermore I ensured my safety with prepared statements. While I technically don’t accept direct user input, setting a custom user agent for example could lead to serious vulnerabilities down the line.
Since I don’t use any external tools, and everything happens server-side, even the most paranoid forum lurker would not immediately spot anything fishy about my blog.
In the next part, I will describe how I use the information to do a bit more investigative work. Stay on your toes 😉
[springtrap]
If you want to know how to get a lightweight WordPress instance running in your home network (proxied through cloudflare of course), I’ve got you covered: Just check out this post.