If you stumbled across this article, I am confident you have already heard of Pi-Hole and its capabilities. At the core, it is a local DNS resolver with white- and blacklisting features that comes pre-loaded with advertising, malvertising and spam filters. In this article, I will expand on the concept of network wide DNS-sinkholing by deploying a (local) Pi-Hole alongside a Wireguard VPN, thus enabling you to use it from anywhere in the world

We will go over the concept and architecture first, then proceed to the installation and configuration of Pi-Hole as well as Wireguard and think about what to do next in our brand new environment as well.
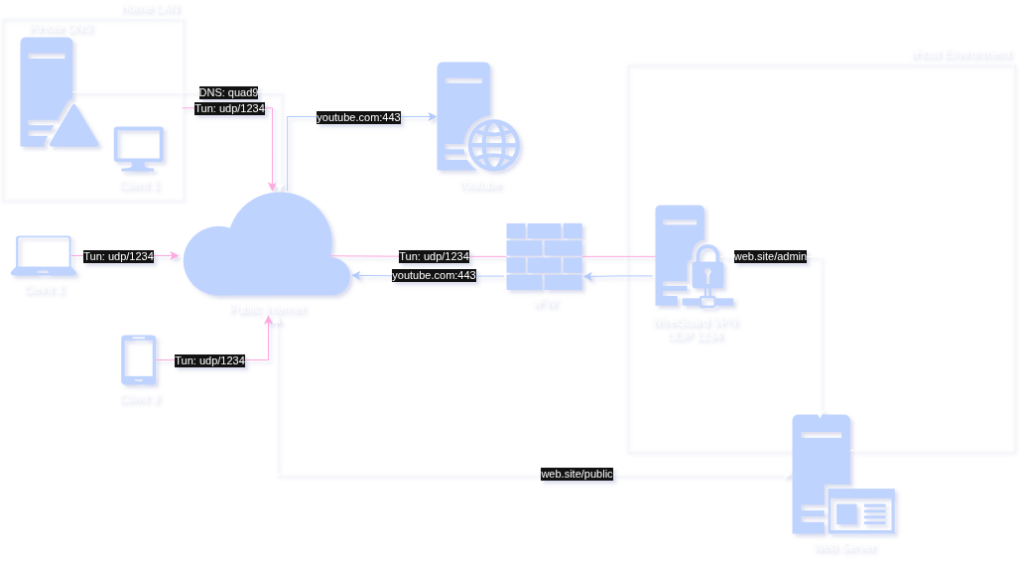
There are multiple considerations when it comes to building your DNS. If you are already using a Pi-Hole DNS in your local network, then you are basically 50% done! All you have left to do is spin up a Wireguard and make your local devices members of the virtual network. You can simply skip to the Wireguard instructions down below.
If you are looking to build this architecture from the ground up, however, you might want to opt in to the full-cloud-implementation: Wireguard and DNS can live on the same vHost in the cloud – this would of course disqualify any local clients from accessing the Pi-Hole unless they are actively using the VPN, which might be a non-starter if you are not planning on using an always-on tunnel.
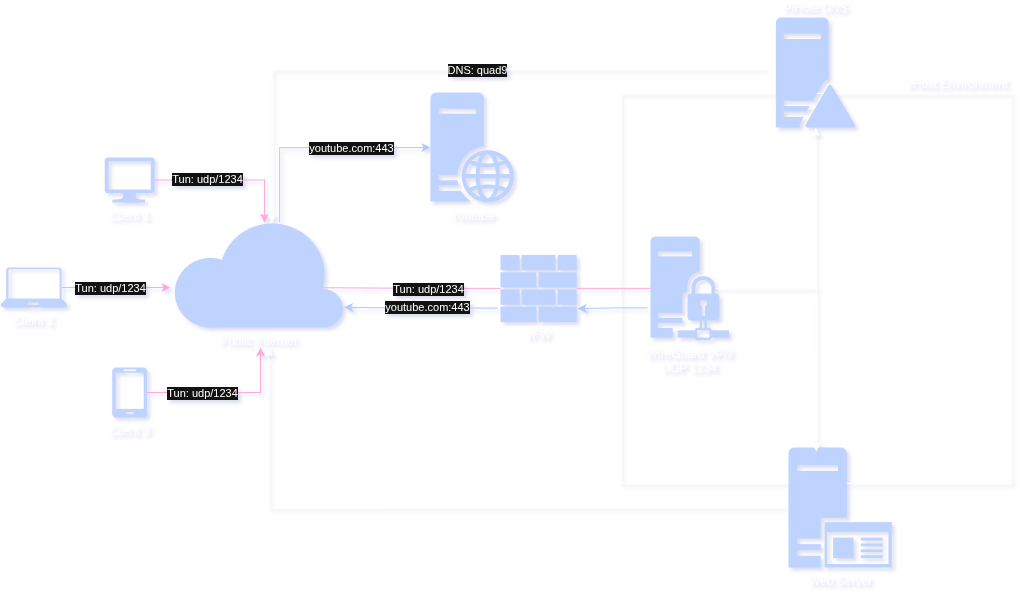
Above, you can see the cloud-only concept. Compared to the hybrid-implementation below, there is one glaring upside to keeping the DNS close to the VPN server.
Consider the following two DNS traffic flows (uncached)
- Hybrid
Request: Local network -> VPN -> pihole -> quad9
Response: quad9 -> pihole -> VPN -> Local network - Cloud
Request: Local network -> VPN/DNS -> quad9
Response: quad9 -> VPN/DNS -> Local network
Depending on the geographical distances between you, your home network and the cloud provider, the additional hop from the cloud back to the LAN can add a good 20-60ms to your RTT, whereas resolution on the Wireguard server directly saves you this additional hop. This is further improved by querying your local zone or cached records.
Wireguard Setup
The first step is to prepare the system, install all dependencies and generate keys for establishing connections
### update system and install apt package ###
sudo apt update && sudo apt upgrade
sudo apt install wireguard

### create server key-pair ###
sudo mkdir -p /etc/wireguard
sudo chown $USER:$USER /etc/wireguard
cd /etc/wireguard
umask 077
wg genkey | tee privatekey
wg pubkey < privatekey > publickey
Also ensure that the server has enabled IP forwarding:
echo 'net.ipv4.ip_forward=1' | sudo tee -a /etc/sysctl.d/10-wireguard.conf
sudo sysctl -p /etc/sysctl.d/10-wireguard.conf
Next, you need to create /etc/wireguard/wg0.conf and build the config file like this:
[Interface]
Address = 10.255.255.1/24
ListenPort = 50505
PrivateKey = [SERVER_PRIVATEKEY]
MTU = 1300 # safety buffer, ensures compatibility
PostUp = iptables -t nat -A POSTROUTING -o eth0 -j MASQUERADE
PostDown = iptables -t nat -D POSTROUTING -o eth0 -j MASQUERADE
Table = auto

### peers will go here ###
[Peer]
...
Depending on your setup, you may or may not need the iptables NAT rule, but I have left it in for the sake of completeness. 1300 is a very conservative MTU, which is only really necessary if you’re using the VPN via mobile networks, through multiple NATs, in 3G or other jank. It is sort of an “avoid troubleshooting sessions” kind of setting.
Finally, you have to enable the service and start onboarding clients. For this, you have to repeat the first step of installing wireguard and creating a key-pair, but do it on your client this time. You can also create and prepare the keys along with the config on the server, it does not make a difference. The important thing is that you do some cleanup afterwards and not leave private keys lying around where they do not belong.
Here is the full server config with a peer included
[Interface]
Address = 10.255.255.1/24
ListenPort = 50505
PrivateKey = [SERVER_PRIVATEKEY]
MTU = 1300 # safety buffer, ensures compatibility
PostUp = iptables -t nat -A POSTROUTING -o eth0 -j MASQUERADE
PostDown = iptables -t nat -D POSTROUTING -o eth0 -j MASQUERADE

### WIN11 Laptop ###
[Peer]
PublicKey = [CLIENT_PUBLICKEY]
AllowedIPs = 10.255.255.2/32
PersistentKeepalive = 15
The clientside config should look like this:
[Interface]
Address = 10.255.255.2/32
PrivateKey = [CLIENT_PRIVATEKEY]
DNS = [PIHOLE_IP]
MTU = 1300
PostUp = ip route add [WIREGUARD_IP] via 192.168.178.1
PostDown = ip route del [WIREGUARD_IP] via 192.168.178.1

### the peer is the server from this perspective ###
[Peer]
PublicKey = [SERVER_PUBLICKEY]
AllowedIPs = 0.0.0.0/1,128.0.0.0/1 # route splitting
Endpoint = [WIREGUARD_IP]:50505
PersistentKeepalive = 15
Again, I have left in a very Linux-specific artefact in this client config, which is the “special” route we definitely do not want to tunnel: the wireguard host. This is done via clientside PostUp and PostDown
Windows, Android and Apple seem to handle this automatically, on my Garuda Linux I had to add this manually to make it work. Your mileage may vary.
AllowedIPs is basically a list of routable addresses that will be tunneled. If you wanted to fully tunnel all traffic through wg0 you could simply enter 0.0.0.0/0 making it a ‘default route’. But splitting the IPv4 range like we did in this example has a really positive side effect: The routing table now does not have a ‘one beats all’ default, therefore direct connected routes that are more specific (like a /24 for example) will bypass the tunnel. This excludes LAN addresses from being tunneled.
Now you are ready to enable the wg0 device on the server and start your first attempt of firing up the client tunnel. On the server, run the following to start the VPN interface and make it survive a reboot:
sudo systemctl enable wg-quick@wg0
sudo systemctl start wg-quick@wg0
Pi-Hole Setup
It does not matter where you setup your Pi-Hole, the setup is always pretty much trivial. To prepare, if the DNS server is not hosted on the same device as the VPN, you must create a Wireguard peer configuration and test it before setting up Pi-Hole. The VPN has to be up and running when pulling the installer. That is, because we need to select wg0 as the listen device in the later stages of the install script.
With that said, to configure Pi-Hole on a Ubuntu you simply pull a bash script from the official server and pipe it to bash. Now, I know what you’re thinking
But Gressi, you shouldn’t just pipe code from the web into bash as sudo

It’s true. But stop being a smartass. You wouldn’t have read that code anyway.
curl -sSL https://install.pi-hole.net | sudo bashthis bad boy will automatically run the prerequisite checks for you and once it is finished installing will guide you through the setup via CLI GUI.
Just remember to select your wg0 device when prompted.
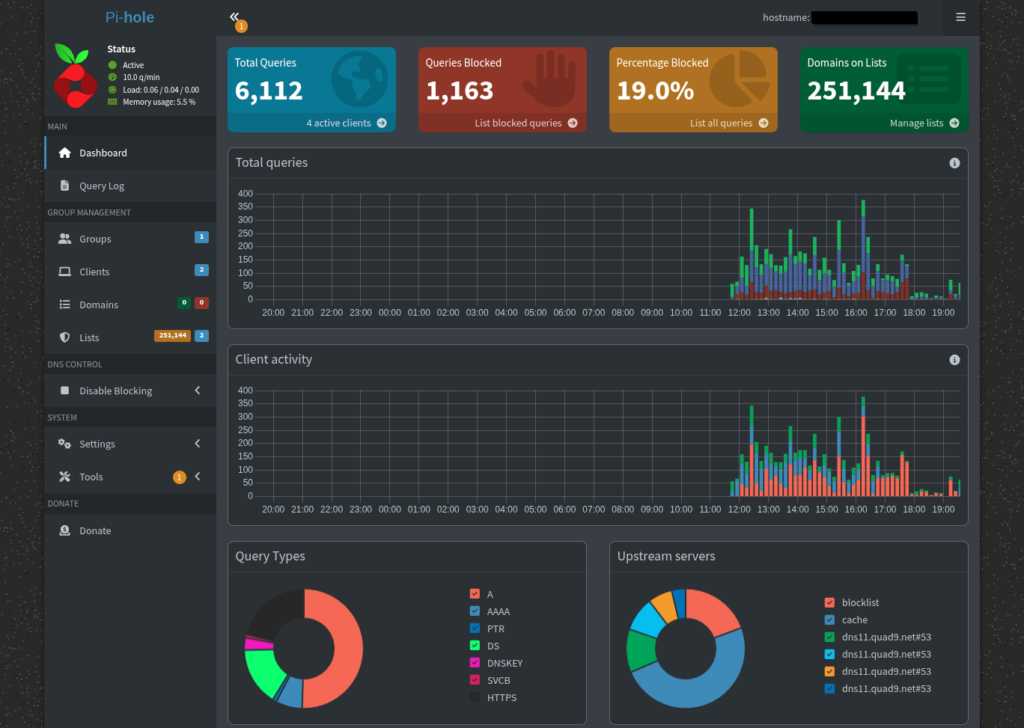
After that, you should login to the dashboard and check on your hard work – make sure you check via direct IP access through your tunnel first. That is usually a decent indicator of how badly you screwed shit up.
In case of emergency, consider checking out the /etc/pihole/pihole.toml config file first. In there you can set interface, domain, ports and ACLs for the dashboard, should anything be out of order. Just restart pihole-FTL.service after.
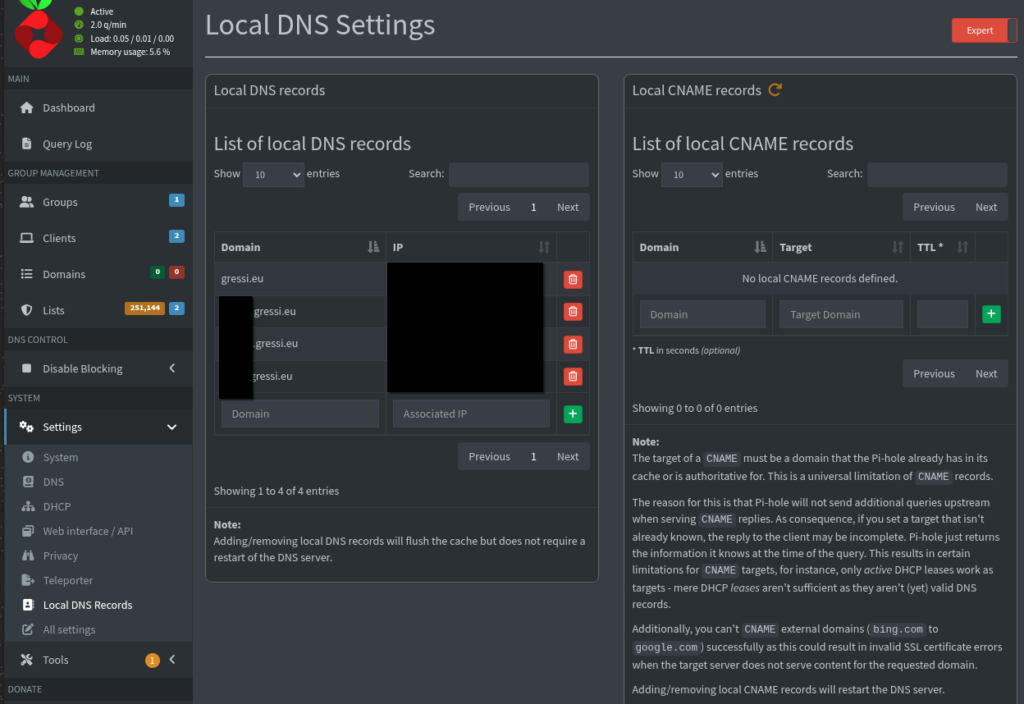
One final tweak for local DNS resolution:
echo "local=/you.com/" | sudo tee /etc/dnsmasq.d/01-local-you.conf

pihole reloaddns
This makes your Pi-Hole an authoritative zone for you.com. This means you can create local entries for all of your systems, which will be correctly resolved into their VPN addresses only.
Under “Settings -> Local DNS Records” you can then manage local entries such as A records and CNAMEs.
If you have already added the Pi-Hole IP to your other clients wireguard configs then you should be ready to go.
A query from an active Wireguard peer to any public domain should now return something like this:
❯ dig youtube.com
; <<>> DiG 9.20.18 <<>> youtube.com
;; global options: +cmd
;; Got answer:
[...]
;; Query time: 36 msec
;; SERVER: 10.255.255.1#53(10.255.255.1) (UDP)
;; WHEN: Tue Feb 03 20:35:13 CET 2026
;; MSG SIZE rcvd: 56Final Thoughts
Sadly, the era of pure DNS-level adblocking is almost at an end. Tons of streaming services now serve ads either from the same subdomain as the content, or even embed it directly into the stream server-side. This is something that the Pi-Hole can and will not bypass. However, this does not mean that DNS sinkholing is useless by any measure. Update your blacklist frequently (best achieved via daily cronjob, just change /etc/cron.d/pihole to fit your needs) and you will notice that even the most savvy of server room dwellers still sometimes follow hyperlinks they shouldn’t.